Monday, April 19, 2010

Damp Damp Damp!!!!

A cool Sunday afternoon, there are something I wish to do on my car, to put the DAMPIT! on the bonnet, and roof.

For the Hood, a piece of cake! Advantage, even lower 'wee wee' sound for the AL4.


The coming next , Roof top removal, tell you what, please don't simply do, it will damage the roof if no done properly.

First, remove everything supporting the Roof cover.
1. A pillar, B pillar , C pillar cover, have to remove sun visor, handles and rubber edge too, not so difficult anyway.


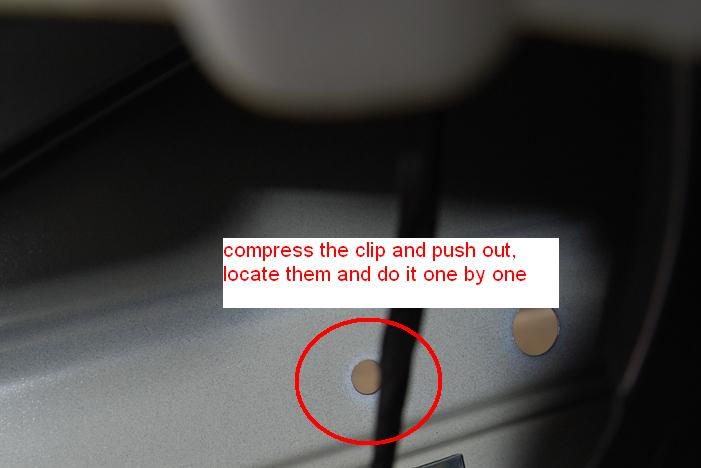
Look at the C pillar Catcher area, if pull properly, it comes out perfectly.

Forgot, you have to remove this too. This is the front room light and seat belt warning cover.
It has 6 catchers for white outer cover, the plastic bracket has 3 metal catchers catches the roof.


2. the most difficult part, the roof carpet is actually glued on the roof! DAM IT! When I knew it, it is too late, I torn the cloth inside!!! but it just in side, Luckily, What to do ? no turning back, had to continue (i was so nervous, afraid of damaging the roof carpet).

Actually roof carpet has 3 layers, Sponge (outer which we can touch), Fiber (center layer which is very hard to support whole carpet), and cloth type tissue (laminate the fiber inside).

When you have remove everything that support the roof carpet, it will still stick to the roof, until you pull slowly, insert your hand in to the roof to tear off the glue area.

As below:


I glued it back (the torn carpet layer), using UHU, + a little bit of water.
Look at that, our 308 roof is totally naked! No wonder rain drops create such a big 'tik tak' sound. The Damping effect is coming from the glue and roof carpet itself.


To highlight one thing, Peugeot just using a cheap plastic with glue ( those which used to cover the door interior before handling to the customer, to prevent scratches) to cover the rear room light compartment, I totally 'Beh Song'. I used thin sponge to cover and remove the plastic. See! so cheap!

FINALLY!!!!! easy job, heat up DAMPIT to 80C and stick the DAMPIT! one by one symmetrically, until it is damp enough to create 'thump thump' sound.


Precaution: when assembly back, please remember all the things that you removed are properly placed in its original location. Otherwise, rattling will occurred.

At last, the roof now is solid, without over damp (I put just enough). It really helps in road noise reduction.

Now, my car road noise is focus on the wheel and floor area, no more noise from top.

Recall:
1. Did I damage anything?
Yes, the tissue. haha.

2. Did I cause some rattling?
No, Perfect so far.

3. Did I forget to bring out something inside the carpet?
Yes, took out already.

4. Did I spoil the outlook of the carpet? scratches?
Nope, looks Perfect, no one knows until I mention.

5. How I feel?
I feel Worth It , satisfied, and happy........hahaha.....5 hours......

Next target, AUTOFOAM!

Saturday, April 10, 2010

Noisy boot

Today feel like going to DIY again for the noisy boot.
Saw in a forum, someone recommend GSI dampit! mat for door acoustic treatment and metal sheet anti-vibration.

Asked my friend, the shop he works has it, for RM secret. ha.

The mat is quite a big sheet, about 1m x 1.5 m. The material is not butyl, so it is more stable at wide temperature range (at least stable in Malaysia's weather) .

I try it on my boot, you may not realize the existence, because I sprayed it to the boot color which is silver. Please click to enlarge it.

Next is the road test, I could find the humming noise from the rear tires is reduced, too bad I don't have an equipment to measure the dB reduced, I will purchase one soon.

Wednesday, March 31, 2010

Rattles here rattles there rattles everywhere (3)

As Brother Behcw mention, the gear stick area rattling is caused by this:
Add some cushion will do.

Rattles here rattles there rattles everywhere (2)

Did you hear some rubbing noise at rear seats?
Ya, stupid metal to metal contact.
I add cushion on it and the noise just gone away. Just as simple as this.

Why Peugeot didn't do that? Or design something better?

I really like white LED lights

I changed all room lights and no plate lights to LEDs.
Yes, all of them.

here are 2 samples at the boot and rear room.


Looks little bluish because of my Nikon D60. Actually it is about 6000K. Try to get 4300K but cheap China part no QC control on color temperature.

Door clips RM32.80 one piece!!!!

This is the one, on the left is 308's, on the right is 206's. RM32.80 (308) vs RM0.60 (206)
1 x 308 = 55 x 206, who priced it? Ridiculous! If you broke your clips, please by 55pcs of 206's one to spare in stead of 1 pcs of 308's.


Tell you a secret, you might not know, there are 8 more clips at the boot! why not swap it with the 206 one and install the 'hidden' 308's onto you doors, if someone broke your clips when tinting? or some repairing?


Wasted to put a rubberize clips here,


Why not put this one? They are the same, exactly same! Forget about the rubber, does nothing here.

Hood insulator- ORIGINAL!!! To be proud!

Finally got my hood insulator last week with 11 clips.
Cost me RM292 + RM33(for clips).

Original, the best, I was waiting and waiting for this part to get rid of my engine/AT noise.
However, the result is not stunning, just satisfactory.
1. Engine noise, reduced 50%
2. AL4 wee wee sound, reduced 50%
3. Aeroplane intake noise, inaudible
4. Rain drops noise from front reduced
Quite happy already.

Oh ya, I would like to mention one thing, as per normal, Conti cars are made of high percentage of Eco material, the hood insulator as well as the engine fire wall insulator are made of paper!!! yes, paper!

I want it to last longer, therefore I painted the edge of it, let it absorb into the paper to create some water proof edge. Hope it would last longer, hmmm... should be?

Tuesday, March 30, 2010

The Kok sound underneath over rough surface and road bumps.

I complaint this to SC, a technician there help me to tighten all lower arm nuts and now it is more than perfect!

But? was he over tightening? He just used a wrench with 'Home made extension'. Turn it another 60 degrees clockwise after i did it at home.......... At least he did that slowly and carefully .

I put a torque wrench at 140NM, still can not solved the kok sound, I could turn no more, because I can't get under the car with a good and comfortable position to apply my force onto it.
But he could, by standing under the car, :)I think now will be 200NM. Scary. But for a 21" nut, 200NM still ok kuah?


Total number of nuts tighten by him, 4 pieces of 21' nuts, 4 pieces of 18' nuts. all almost 60 degree. Turn effortlessly by him, powerful man, powerful extension I mean.

Door hinge project (latest)

Since I just created the blog only on 30 March 2010, there are many things I have done before, but allow me to put the latest one I did since it's still fresh in my mind.

I missed out some pictures here, so sad.

Here is the door hinge I removed, the catcher pin is not shown inside, (I will take complete pictures when doing this on the front door), oops! forgot to mention, I have just finished working on the rear doors.


See the springs before and after? I repainted it to prevent rust, just worry, the color of the spring after heat up and cool down remained the same, but please let it cool down slowly at room temperature, Caution!! don't put the hot spring into the water, you will spoil the spring by ruin up the molecules.


Ha, 'Bunsen' from Italy, cost me RM68. Good for spot heating.


Completed, ready to be re-install.


The feeling is now suit to my taste, my friends also agreed with it, used to hit my sister's head when it bounced back but now should be ok.

Haha, we can't see doesn't mean we don't know!

Shit, the dirty rusty driveshafts!

Naked...naked...naked....


Painted...painted..painted.... (A normal RM2.00 black paint is more than enough)


Well, you have to jacked up your car to get this job done. Tell you what, the Juru SC bended accidentally my 'jack-up area' while servicing my car, spent me more than 2 hours to repair it, I have to knock it back, resurface and repaint it, and then complained to the SC. But I just did the other way round, I should complain to them at first and then only repair, no proof anymore, sigh!

Those who always service at AUTOCITY, ask them to be more careful.


Double protection is needed, reduce the risk of dying young.

Rattles here rattles there rattles everywhere (1).

This car is not any better than other branded cars outside (except those lauzy one, you know what i mean).

This car rattles! On the first day!

I point out the first rattling source I fixed. Many others later.

1. The annoying sun visor:
it is not rattling at this position,

But not like this! And it is not caused by the touch n go card.


Guess what?
This is it!
Put a drop of Super glue inside the sleeve as shown, carefully, to prevent flowing to the outside, the rattles will gone in few seconds.

Feel loose on your car key? same method, put a drop of super glue and that's it! You are done! Opps, you might mistakenly thought I glued it and it stays open, no...... just put a drop between the key and the key slot, don't over fill it.

Man I really don't like the black naked protection bars.

This must be the first thing I did, forgot already.

First I remove the protection bars, this is not easy, Peugeot has designed the clips to be very strong and hard to be removed from outside, I dismantled the door panel and un-clipped from the inside.


Once the bars have been removed, you can start the paint job instantly.
First, 'ka1 chang1' : tools.
I went to a paint shop, AIKKA Kampung Benggali, asked them to mix the paint for me. Waited 30minutes, quite efficient I think and never forget to mention, it's just RM20 each!
They recommended me to buy the Plastic Primer too, you want you paint to last longer and never peeled off right? Here they are!

After these 2 coats, normally people will stop, but I would need a nicer and more professional finishing, I also add a clear coat, from Sikkens, great OEM brand for Mercedes Benz.
The spray gun I bought cost me RM280. same price as the compressor!


But the finishing is excellent!


Although there is some color shift, but I am very happy with the result. Looks more THP now, haha.

My new ride

After driving an Optra for 6 and a half years, itchy heart started.
Saw a newly launched 308 in February 2009, really couldn't stand the beauty of it, must own one, I thought. But look at the payslip, aih.....couldn't really get the THP if I wanted to utilize only 15% of salary for installment.

After struggled for 6 months+, finally got my VTi,' no fish , prawn also can'. Ha!

Still a beauty, isn't it? I took this picture at Sungai Dua Paddy field.
I prefer the 2 crome lines in the mouth of the Vti over the full silver painted THP.

But soon I got it, I found many small issues, like black door bars, black bumper side protector, some rattles, klok klok sound when drive through bumps........ I am gonna busy again, with this new car, well, I was always busy with my Optra too, but my love "transferred to 308 already". ha, men are not created to do multitasks at one time.

Crappy stock speakers replacement.

I can't really accept the sound quality of the stock speaker, although it's made in Italy and Poland, so what?

Front:
Rear :For the front speaker removal, I need to drill off the rivets, make sure you have a riveter if you do so. I stick on a masking tape to prevent the 'sisa-sisa' aluminum to drop on the soft glue.


For rear side, you just have to unscrew it, no rivet for this!

Oh, before that, let's how the door is removed at first. ta da!


Quite easy isn't it? But....beware of broken clips.
I was once changing the stocks to Sony's once, but I still prefer the Kenwood's, sounds more crisp. hmmmmm.......quite. Not saying Sony is bad but just not suit to the low power HU.

Ya, the final result as below:Hmmmmm, sounds a bit better, just a little for RM400. You don't wanna do that??